_14e30a.png)
_8126ce.png)
Leaderboard
-
-
-
Legolash2o
ContributorsPoints5,661Posts


Popular Content
Showing content with the highest reputation on 02/09/2013 in all areas
-
Unattended Creator
alfreire reacted to Legolash2o for a post in a topic
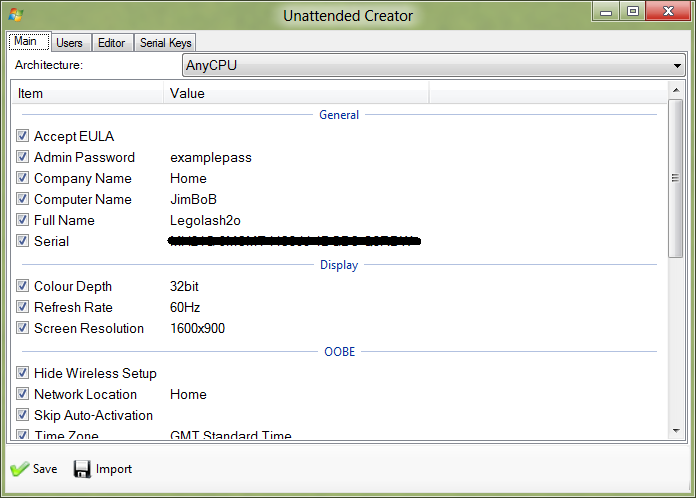
1 pointThis will let you have you Windows installed unattended. It's not the most complete unattended out there but it's better than nothing. Luckily most of this is self-explanatory, note it is recommended to leave 'Architecture' set to 'AnyCPU' which means it should work for both x64 and x86 installs. Main This is where you select the most important parts of the unattended file, like your name, serial key, time zone, screen resolution, updates, Auto-Logon, etc... Users The 'Users' tab lets your add pre-installed usernames on the computer, with passwords, user group, description, again self-explanatory. Editor (Advanced) It is recommended to leave this alone unless you know what you're doing, since W7T does not have full unattended features it allows users to add their own entries and save them to a file, it also allows the user to see what will be saved. Serial Keys These serial keys are known as 'Default Keys', they are basically just used to make the install unattended by leave Windows de-activated and keeps the 30 day trial. WARNING: If you use a Ultimate serial key then you must install Ultimate otherwise it will error. Integration You can use the 'WIM Manager' to integrate a unattended file.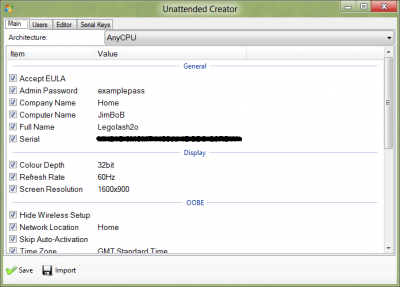 1 point
 -
I am going to attempt to document the process that I use to make my images using WinToolKit and a few other tools. This will be a bit of an ongoing documentary and I hope this will be helpful to others and I am also very open to the forum for suggestions and improvements .. after all I have learned everything I know about integration's from the numerous forums I am a member of. I do not profess to be any kind of expert or authority, in fact quite the contrary... I am a professional in the IT field but I am learning everyday and humbled all the time I would be remiss if I didn't start with some thanks to the many individuals and groups that have helped me for the years I have been doing this and if I missed anyone please forgive me as it is only an oversight and not a lack or appreciation. In no particular order My Thanks: RyanVM http://www.ryanvm.net/forum/index.php and far too many individuals on the forum to list here... for me this is where it began and I spent years doing amazing XP integration's thanks to the forum and the members DriverPacks http://forum.driverpacks.net again what can I say... they are unrivaled in their excellence at what they do and they literally did what no one else could at a time when the industry that was truly in turmoil. They then continued to provide something that no one else came close to. They helped me for years and I rely on them still WinCert & My Digital Life http://forums.mydigitallife.info/forum.php have taken my skills with Win 7 to an entirely new level... can't thank them enough for the tools they have brought to me Ricktendo http://www.wincert.net/forum/topic/10480-slim-net-framework-45-full-x86x64-1-08-2013/ has been my reliable single source of .Net development pretty much from day one McRip http://hotfix.cesidian.info , Komm http://windows-update-checker.com , Burfadel http://burf.cesidian.info/ , what can I say!!! Without your work I would give up and I am in awe... I could never do an image without your work and what your scripts do is magic Liam, this is simply the most amazing tool and the best supported/developed overall integration tool PERIOD! I will definitely mention other individuals as I continue this log Liam and/or Kel If this in inappropriate in any way or not what you want please just let me know and I will cease Lastly everyone be patient I am not a technical writer and for that matter I grew up in New York and some say I barely speak English :-)1 point
-
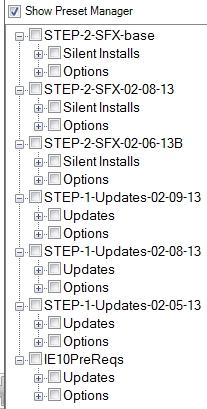
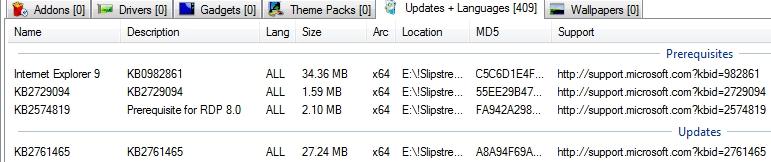
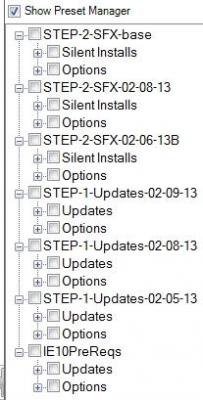
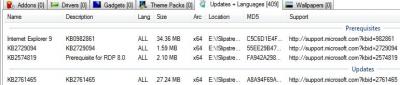
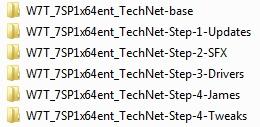
Step 1 Integration The first thing I do is copy the vanilla source files from "W7T_7SP1x64ent_TechNet-base" to my target directory "W7T_7SP1x64ent_TechNet-Step-1-Updates". I then open WinToolKit, and if I haven't already done it I will go to the Update Catalog, select my McRip choice and makes sure I have the latest updates. Actually I spend quite a bit of time checking and reviewing updates and I use http://forums.mydigitallife.info/threads/19461-Windows-Hotfix-repository and the members there to provide the support for this part. Once that part is done to my satisfaction I open the AIO Integration option and select my "W7T_7SP1x64ent_TechNet-Step-1-Updates" target. In this case I will skip the preset and start from scratch to create a new .ini I select the updates tab and then follow the same specific procedure every time I do Step 1. NOTE: this months update sequence changed slightly due to Windows Update showing some of the IE10 pre-req's so I added them at step 2 below in this phase, every other step I have been repeating exactly for about a year and more integration's than I can even remember 1) Select Add Updates & Subfolders, select IE9 folder found in the Additional folder and WinToolKIt will properly add them all 2) Select Add Updates, select KB2786081, KB2726535, KB2729094 found in Additional IE10ReleasePreview and WinToolKIt will properly add them all 3) Select Add Updates, highlight and select every .msu in the _Updates "McRip Windows 7 x64" folder *** At this point I select the GREEN folders and items that I want to add to my image and this will vary based on your personal preference and need. RDP8.0 has one item I add in Step 1 *** 4) Select Add Updates & Subfolders, continue to select each GREEN folder (i just do them in sequence) and WinToolKit will properly add them all. When you reach the BROWN "RemoteDesktopProtocol8.0" use Add Updates and only add KB2574819, then finish off the rest of the GREEN folders. I have now added all my updates that apply to my STEP-1. Now at this point I actually don't run it yet because I just created a new .ini and I want to compare it to an old one and make sure it looks right and that I haven't forgotten anything. As much as this seem overly anal, each integration takes more than 2 hrs so the few minutes I take to check my work is well worth it and I have often found something I left out or wanted to change. So what I do is select Presets-Save All and then name the ini something like "STEP-1-Updates-02-09-13" So here is an example of what we have after I saved the latest Step-1 Preset and I reloaded an image and what to use it: When I load that Preset it will look like this: Here is my actual STEP-1-Updates-02-09-13.ini STEP-1-Updates-02-09-13.ini Additional Notes: I actually save lots of .ini files and I will even edit ini files sometime during the month as new updates get release. What I tend to do is wait until a week after the major release date (2nd Tuesday of the month) because that's about the time frame that McRips scanners finish and he and the others at http://forums.mydigitallife.info/threads/19461-Windows-Hotfix-repository have pretty much stabilized the releases then I create my new image. But we all know that additional files get release so sometime I just edit the .ini and add them that way. What that gives me is a new and updated .ini without having to really do much at all and if I want to use it as a preset for a new image I am good to go. Also If I have already completed my images and new updates come out I just open that target, add the additional hotfixes to my already integrated image and the image will be up to date. I really don't due that often but it definitely works. I have found it just as easy to use the new preset, start a new integration, go to dinner, have some wine and come back and its done, then I just run the additional steps and since they run much faster it's not a big deal... just my preference.
 1 point
 -
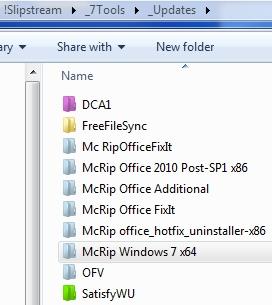
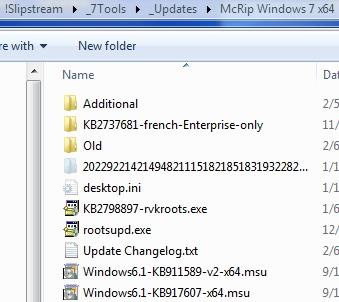
E:\!Slipstream\_7Tools\_Updates\McRip Windows 7 x64\Additional *** The folder "Integrate to installation media" is contains fixes that I am currently investigating so the color and associated lend is not accurate***
 1 point
 -
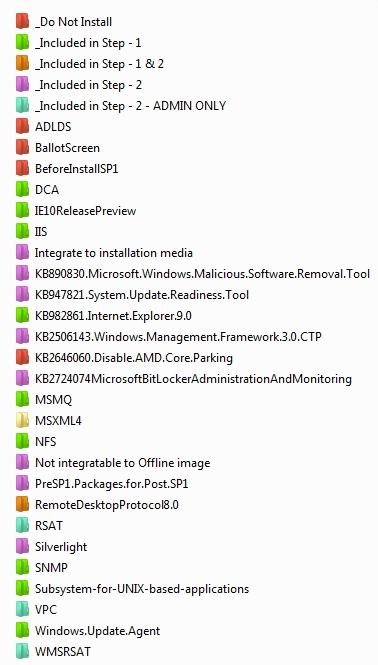
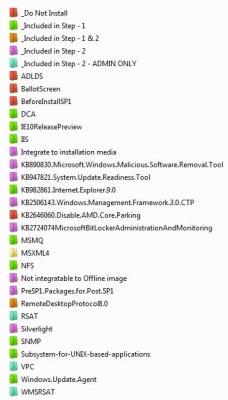
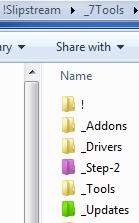
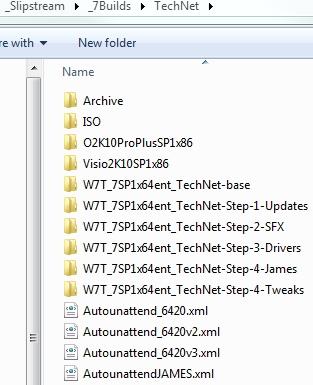
Step 1 Folder Structure Step 1 is the heart of my integration's and in general probably creates an image that is about 95% "done" if I was looking for just a updated Win7x64 image with nothing else added. The remaining 5% would be the additional MS items that can't be integrated this way, some MSFixit solutions and some reg settings that need to be applied. After those we would have an image that would be updated as of that date which could be used for all your future installations The one thing to note is that I am 100% sure that if you run that new image in its current state it would NOT completely satisfy the Windows Update when run and it would NOT pass a KUC run, which is why I use the KUC and will explain much later. More about my directory structure (this is long so be patient): My structure is actually based on advice I had received years ago when using the RVM Integrator and I have modified it further. I am a very visual person so I use color to help me and I also personally need lots of structure when doing things so all of my folders have a "logic" that works for me. At the top level I separate my "tools" and my "builds" into two separate folders and I keep those in the root of my drives. I use a single "!" and "_" to keep them at the top of my directories so I can get them easily. Drilling down further into the _7Tools brings me to the main folders I use; "!" is something I am actively working on right now, _Addons contains specials tools to make certain addons (I will explain later), _Drivers contains all my driver related items used in STEP 3, _Step-2 contains all my SFX and silent installers used in STEP-2 and _Updates are the updates used in STEP-1 Drilling down further into_7Builds I have just a few folders and some simple scripts that are very important but I will talk about in STEP-2. The $OEM$ folders contain all my work that must be done in that manner in STEP-2, CPG and TechNet contain the targets that I use and they are similar but CPG is my work for a specific client, TechNet is mine, we will be using TechNet for all further discussions. OK so if your still with me were now in the _Updates folder. I actually have many folders in here but the ones that are important are the "McRip Windows 7 x64" and the "SatisfyWU" and for now we use "McRip Windows 7 x64" which is the download structure that is created by WinToolKit when using the Update Catalog feature and selecting McRip's updates which are currently the main source I use for my work. The last folder to explain before we move on to the actual integration is the Additional folder. I use the Additional folder and the included updates that McRip offers and in order to obtain these I UNCHECK the Update Catalog Filter in WinToolKit Options-Main-General. Here is where I use my most "color" and I have actually created a legend using the top 5 folders with "_" to help me keep things in order. I think the legend actually pretty much explains this :-) ***I need to upload the image into the next post since I have exceeded the attachment size***


 1 point
 -
Description of My stages: By no means am I saying this is right or the only way it is just MY way. Ever since I started with my XP integration's using the RVM Integrator I have always done integration's in phases Frankly it allows me to make mistakes and recover/troubleshoot rather easily plus I can reuse the various phases for development. I have also always used multiple disks to try and maximize the I/O read/write aspects of the process. Early in my learning phase I found that the more spindles I had the better my times were. This has changed with the WinToolKit and I am still testing to see what provides a good balance of speed and reliability. Currently I have a laptop with an SSD and a HDD. So here is what I do now with the WinToolKit 0) I take my vanilla Win7x64 Enterprise extracted image and I have a "base" image directory that I keep on my drive and never change 1) I have a directory that I copy the base to that I only use for MS updates and nothing else. I use McRips files and I will provide much more detail on this later 2) After I do the updates I copy that completed integration to another folder where I apply only SFX/silent installers and anything else I want to run in that manner ***I always burn an ISO after step 2 and test in VirtualBox before I continue to the drivers. for me everything has to work 100% before I moved on*** 3) I then copy that directory to another folder where I do nothing but driver integration's 4) I copy the completed drivers 3rd step to my Tweaks folder where I slim and remove items or other tweaks and specialty items I then test my final image on real hardware using a laptop I have to test my images. I burn my image to a USB and do all my installs that way. The laptop has an SSD so it helps the testing process be as quick as possible. This physical stage is mostly for driver testing but I do catch other items as well. I will add more details about STEP 1 in my next update
 1 point
 -
1 pointI don't know if I should post here, but about the Manufacturer Logo information, what exactly should I put there? The path from my computer where the logo is located? or in the image folder? This section only asks the following: "Enter Logo", or something like that. Cheers1 point