-
Posts
5,661 -
Joined
-
Last visited
-
Days Won
243
Content Type
Profiles
Forums
Events
Everything posted by Legolash2o
-
6.1.7600.16385, don't think it is. Gonna try updating them now
-
I'm sure you've all noticed the new sub-forum called "Windows 7 Toolkit Guides". This new sub-forum is where you can learn how to use W7T. Please don't make any new threads on there however feel free to post questions in the correct thread about the tool
-
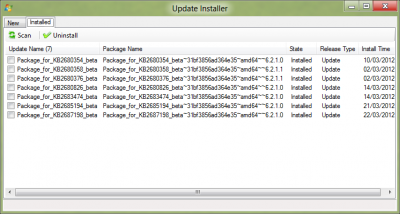
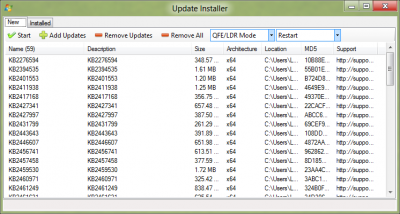
The 'Update Installer' lets you integrate cab updates into your currently installed OS, i only use this when i've download an SoLoR update and want it install with QFE/LDR mode on my current install. Installing Updates Step 1: Add your CAB/MSU Files Use the 'Add Files' button to add your cab files Step 2: Click Start Once your files have been added, click 'Start' and W7T will start installing the dpdates on your computer. Step 3: Wait Wait may take some time to install all the updates, so go for coffee, cup of tea or whatever you prefer. W7T will let you know when it's done, it will also prompt you if a restart is required. Optional: QFE/LDR Mode This is disabled by default, but when enabled W7T will install the 'update-bf.mum onto your computer which are experimental updates which don't normally get installed. I use this ALL the time http://blogs.technet...fe-ldr-wth.aspx Uninstalling Updates Step 1: Press the scan button This will check which updates are already installed via on your live system. Step 2: Select the updates you want to remove Tick the boxes next to the updates your want to remove, sometimes it does help to check updates which are marked as 'superseded' and remove those. Step 3: Press 'Uninstall' and wait Now all you have to do is sit back and wait for those obsolete updates to be removed, W7T will update the list once completed. NOTE: If you use the QFE/LDR option then you don't have to integrate the 'LDR Placeholders'.
-
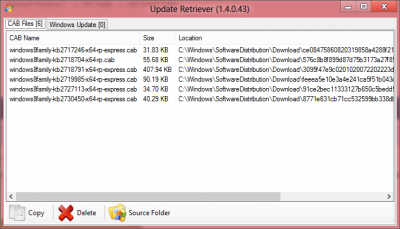
When you download updates via Windows Update, Windows leave a copy of the CAB file into a folder which CAB Retriever lets you copy to a place of your choice or just delete them to save space. The files you decide to copy can be used to integrate into your WIM image. A new feature is that it will also scan WindowsUpdate.log for any MSU links which you may want to download. NOTE: You can only use CAB Retriever if you have *.cab files available to copy. Option 1: Copy Selected Using the list, select the files you want to copy. You can also hold the ctrl key to select multiple files. This option will then only copy the selected files to the folder of your choice. Option 2: Copy All This will copy all the files in the list to a selected folder Option 3: Delete Selected Same as option 1 but this deletes the file from the Windows Update temp folder. Option 4: Delete All Same as option 2 but deletes the files from the Windows Update temp folder. Source Folder This will take you to the folder containing the actually *.cab files. Destination Folder This will take you to the folder where you chose to copy the files to.
-
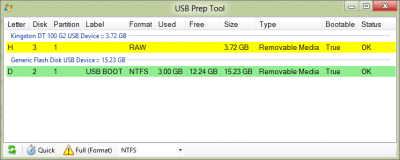
The 'USB Boot Prep' tool let's you prepare your USB stick so that you can install Windows Vista/7 from it, your computer does require support to boot from USB for the USB stick to work. Caution: The 'Full (Format)' button will format everything on the USB stick. W7T will ask if you're sure though. Yellow: Usually means it is RAW and has not been formatted, not bootable. Green: This means the drive is already bootable. Step 1: Plug in your USB stick This tool won't work without a USB Stick so go ahead and insert one. Step 2: Select your stick Hopefully W7T will detect your stick and list it, select the disk/partition you want to be bootable and click start. Step 3: Select Quick or Full Quick: This will just mark the partition as 'Active' and convert it to NTFS if needed. Full: This will 'Clean' the USB stick remove all partitions and data. W7T will work it's magic and let you know when it's done, once done you just need to copy and paste your installation files onto the USB stick.
-
XP and Vista users: You will need to use the DISM Installer in order for W7T to work on your Operating System! Windows 7 Toolkit is a program designed to help you integrate your Updates, Drivers, Theme Packs, Tweaks, Wallpapers, Addons, SFX Installers, Gadgets and remove the things you don't want from your Windows 7 Image. Tools Manager is the main window for Windows 7 Toolkit, there are many tools which you can select. Main - Basic All-In-One Integrator This is the greatest tool in W7T, it's let you integrate, Addons, Remove Components, Drivers, Gadgets, Language Packs, Edit Services, Silent Installs, SFX, Theme Packs, Tweaks, Updates and Wallpapers! ISO Maker This is what it says on the tin, it creates your ISO file for you to burn! Now supports UEFI! Windows 7 Toolkit Guides A nice direct link to guides on how to use Windows 7 Toolkit SoLoR SP1 Updates SoLoR works very hard and providing ALL the updates released since Service Pack 1 so he should get credit for this, this little tool lets you easily download his updates which Microsoft has released via Windows Updates but more importantly which Microsoft has also released privately and which are not released via Windows Update. Windows 7 SP1 ISO Since i prefer my users to use the latest service packs, i have added a link to a completely free, legal and official download source to the Windows 7 SP1 DVD. Note, you will still need your own serial key. Main - Intermediate Unattended Creator I'm sure you can guess what this is, this creates an Unattended file which you use to install Windows with, just create and make sure you place the new file in the DVD root. USB Boot Prep Prepares your USB stick so you can install Windows from it, obviously your computer needs to support USB booting! WIM Manager Manage and edit your install.wim, for example you can rename images, delete images, add new ones, create ISO, rebuild, mount, unmount, etc... You can also use this tool to integrate your unattended files. Main - Advanced All-In-One Disk Creator This tool let's you combine all your WIM files into one DVD, this is most commonly used is to merge x86 and x64 disks. Component Removal This program let's you remove over 100 components which comes with Windows, some of them are Internet Explorer, IIS, Windows Media Player, Sample Pictures, Tablet PC components, etc... I am also planning on adding some more eventually. WIM Registry Editor This tool mounts the wim and then it's registry so you can add your tweaks into that image! Tools Converters Language Pack Converter Converts Langauge Packs which are in the exe format to cab so you can integrate them. MSP Extractor (MS Office) Converters Office Updates to msp so they can automatically install when you install Office. MSU > CAB Converter Converts MSU to CAB files so you can integrate them or install on your current OS via the CAB Installer. Online Installers Driver Installer This will install drivers on your currently installed system using pnputil.exe, it will only install the drivers you need.This tool also lets you uninstall drivers too. Update Installer This will install updates on your currently installed system, probably mostly used by those who use SoLoR Updates. This tool also lets you uninstall old updates too. Image Tools SWM Merger Merge *.swm files into a larger *.wim file so it can be edited. WIM Splitter This tool splits your install.wim into multiple files so you can fit them onto multiple CDs. Capture Image Captures new WIM images, so you can use that new image to install Windows. Other Tools Addon Maker This tool is for advanced users to create .WA files which other users can use the All-In-One Tool to integrate into your image. CAB Retriever When Windows Update downloads updates, the cab files get left in a folder. This tool retrieves those files so you can integrate them. Downloads This has links to the most popular downloads you should need for W7T.
-
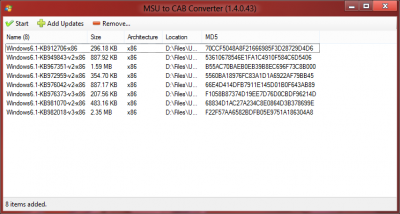
The 'MSU to CAB Converter' converts your Microsoft Updates to CAB files which you can use to integrate into your Windows Image or use the CAB Installer to integrate them into your current OS. Step 1: Adding the Updates Click 'Add Updates' and select the MSU files you wish to convert, you will then see them adding to the list. Step 2: Click Start Click 'Start' and select where you want the MSU files to go Step 3: Wait Wait for the files to convert, files will go green when once they have done.
-
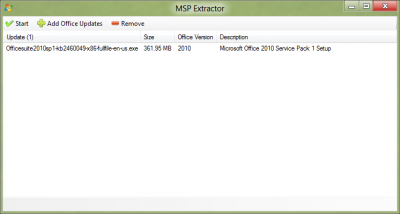
The 'MSP Extractor (MS Office)' lets you convert your Microsoft Office updates into *.msp files which go into the 'Updates' folder of your Office installation disk so that they get installed automatically when you install Office. Step 1: Add your Office updates Click 'Add Office Updates' browse to them (exe) and wait for them to add into the list, you should then see information about the Office updates you have selected. Step 2: Click Start Click 'Start' and select which folder you want the new *msp files to go. Step 3: Wait Sit back and relax whilst W7T extracts the msp files, it will let you know when they are done.
-
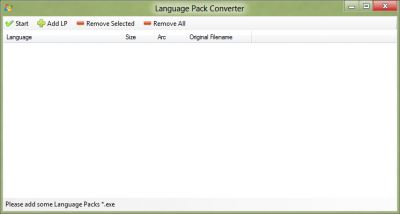
The Language Pack Converter tool converts your langauge packs from the .EXE form to the .CAB form so you can use them to integrate into your Windows image, using either the All-In-One Tool or another program from a different developer. Step 1: Add the Langauge Pack(s) Click the Add button, browse for your language packs.exe Step 2: Starting the process Press the Start button and select the folder you want the .cab to go Step 3: Wait Items that go Green mean they have converted successfully, that's pretty much it.
-
Fixed, will be in v14 which i will release soon. EDIT: Released v14, with the above fix and a few changes to the updater.
-
Are you saying that v1.0.2.xxF won't pick up the new alphas? If so then i know about that issue and had fixed it in one of the early alpha builds. I've made some changes to v14, so it should be better in future builds.
-
ImgBurn is like 2.68MB, the one w7t uses is only 122KB. I can't include ImgBurn with W7T. 1.3.0.13 *FIX: W7T did not always detect if another W7T is running *FIX: Addons did not integrate if foreign character was in the filepath *Tweak: Force Windows 7 Media Player to run 64 bit *Tweak: Add 'Task Manager' to context menu *Tweak: Add Program and Features in context menu *Tweak: Improve USB Storage Devices Performance *Tweak: Custom Explorer Bar 1 *AIO allows IE9.exe to be integrated
-
I don't think it does remove IE8...
-
Done..
-
Just integrate all the apps in both version, but just untick "Always Install", that way when Windows installs it will ask you what software you want to install. Always Install makes W7T install the app regardless of what your choose i.e. DirectX, 7zip, stuff like that.
-
I will move Manikant posts to the requests forum so that i will add IE9.exe support
-
http://hotfix.chris1...t.Explorer.9.0/ I will also add this link to the 'Download' tab. EDIT: Done. Excellent, great to know.
-
Awesome glad it's working! P.S. I've move your context menu tweaks to the request forum
-
Done, but not using the script method. On v13, you should see an UP and DOWN button to let you arrange them in any order you want
-
Thanks guys!
-
@TH-TECH Fixed Logon Background and Run as admin
-
What do you mean all of them???? I'll fix the run as admin thing. Will do.
-
What was you trying to do? Where was the image mounted? I have not been able to replicate the issue, however im testing your settings now, but won't find out the results till after i finish work. Click 'Subscriptions' at the top for more info about memberships. EDIT: Setup background changed, Logon didnt and default background changed... Hmm must be something wrong with the logon background. I'll fix this when i can


