Everything posted by myselfidem
- Unattended and remove ei.cfg
-
[Solved] Addon Maker Variable Directory Variable %ProgramFiles(x86)% Unexpected Behavior
Yes dotfusion, I know that and I think it's needed to improve Addon Maker creating Tasks.txt files ! We can read here about: Addon Maker Issues *Edit: And I have the same result (example): Name=ImgBurn Creator=myselfidem Version=2.5.7.0 Arc=x86 Description=Create iso files. [CopyFolder] ImgBurn_2.5.7.0::%PROGRAMFILES(X86)%
-
[Solved] Addon Maker Variable Directory Variable %ProgramFiles(x86)% Unexpected Behavior
It seems the variables are not allowed in the file Tasks.txt. Don't use it inside.
-
Applying a product key via WIM manager vs. Autounattend Answer File
After looking at the key inside the mounted image, I see that the integrated key using: DISM /Set-ProductKey is inside the registry of the selected image with hexadecimal values! How to know that? 1 - We can mount the customized image inside a temp folder (example Windows 7 Starter) 2 - We need to load the hive WIM_Software using a batch file: Hive.cmd @echo off Color 0A echo. "C:\Program Files\Windows AIK\Tools\x86\Servicing\Dism.exe" /Mount-Wim /Wimfile:"C:\Se7en\sources\install.wim" /index:1 /MountDir:"C:\zMount" echo. pause reg.exe load HKLM\WIM_Software "C:\zMount\Windows\System32\config\SOFTWARE" echo. pause Once done, we can use Powershell with this code to convert the DigitalID Product of Windows 7 Starter Key: Open Powershell and copy/past this code (available for the loaded hive:WIM_Software): function Get-ProductKey { $map="BCDFGHJKMPQRTVWXY2346789" $value = (get-itemproperty "HKLM:\WIM_Software\Microsoft\Windows NT\CurrentVersion").digitalproductid[0x34..0x42] $ProductKey = "" for ($i = 24; $i -ge 0; $i--) { $r = 0 for ($j = 14; $j -ge 0; $j--) { $r = ($r * 256) -bxor $value[$j] $value[$j] = [math]::Floor([double]($r/24)) $r = $r % 24 } $ProductKey = $map[$r] + $ProductKey if (($i % 5) -eq 0 -and $i -ne 0) { $ProductKey = "-" + $ProductKey } } $ProductKey } Get-ProductKey We can see the result matching the key integrated using DISM /Set-ProductKey with Powershell. Help found here: http://powershell.co...roduct-key.aspx Images (Loaded WIM_Software hive, and Powershell matching the integrated key).
-
Applying a product key via WIM manager vs. Autounattend Answer File
Of course (bien sûr)! You can click on my sig below: SetProductkey to download the file. I just tested and works fine. And all the files you can see are available to download. Try again and let me know. Thanks However, you can try this download link: http://www.mediafire.com/?uss84mzbqo91q
-
Applying a product key via WIM manager vs. Autounattend Answer File
However I not tested to integrate the key using WIM Manager with WinToolkit. I made many times using DISM /Set-Productkey to create SetProductKey on my sig below. However I don't know where is saved the key inside install.wim image and if this one is crypted... But we can try, and after the key is integrated, mounting a new time the image to look where is located the key! *Edit: I'm trying a new test to see where the key is located. Maybe this can be found inside the dism.log file inside the mounted image. I tell you later, if I found!
- Applying a product key via WIM manager vs. Autounattend Answer File
-
Error: To commit Image?!
@Phöbus After a new test, I see that the folders "WinToolkit_Temp\Mount" are created now using WinToolkit ! When the image is successfully commited the temp folder "Mount" is removed and all works fine. And when we exit WinToolkit the temp folder "WinToolkit_Temp" is removed. It seems the trouble is the "Mount" folder wasn't empty in this case. Here is my result test (Logs\Mount Logs): [4452] [ INFO ] Mounting new image. Wim: [C:\Win7_SP1\sources\install.wim] Image Index: [5] Mount Path: [C:\WinToolkit_Temp\Mount] [4452] [ INFO ] Wimserv process started for guid e433dace-d32e-46a6-97bd-5c87907a0ad7. Id is 4852 [4852] [ INFO ] ImageUnmarshallHandle: Reconstituting wim at C:\Win7_SP1\sources\install.wim. [4852] [ INFO ] Mounted image at C:\WinToolkit_Temp\Mount. [4852] [ INFO ] Received unmount request for image with guid e433dace-d32e-46a6-97bd-5c87907a0ad7. [4852] [ INFO ] Unmount for image at C:\WinToolkit_Temp\Mount complete. *Edit: You can try to do like this: Exit WinToolkit Browse to the folder WinToolkit_Temp\Mount if exists Select the folder and use on your keyboard "Shift + Del" to remove this one Go to the registry and look at this key: HKLM\SOFTWARE\Microsoft\WIMMount\Mounted Images Remove this key Try again to launch WinToolkit and the temp folders will be created a new time.
-
Create your own Autounattend.xml All-In-One (x86/amd64)
If you added another language for the silent installation (language pack added inside install.wim, boot.wim 1 and boot.wim 2), you can select this one inside your Autounattend.xml file for the silent installation and choose the keyboard you want! HTH
- System Information Viewer - v4.49
-
Error: To commit Image?!
The folder: "C:\WinToolkit_Temp" doesn't exist. Create the folder first manually! Cheers
-
Everything Search Engine - v1.3.3.658b
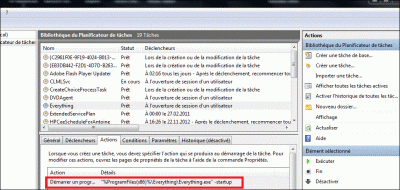
Many thanks bphlpt! Yes, I see there is some errors! And the part Elevation doesn't work. I'm trying to look for a solution using Powershell! And the part schtasks /query gives: "\Everything" and not "Everything" I made some changes to remove the Task if this one exists, and now works to remove first the Task. New file attached. Everything_Schedule.rar
-
Everything Search Engine - v1.3.3.658b
Thanks for your test. Try to download the attached batch file on my post above, and let us know if it works for you. Works fine for me. I attached the file to avoid errors using copy/paste!
-
Everything Search Engine - v1.3.3.658b
If there is some trouble with the batch file on Windows 64-bit, we can use this one instead (improved). Tested on my computer 64-bit and the task is installed on the Task Scheduler. Works on x86 and x64. Everything_Schedule.bat ::*******************************************:: :: Everything_Schedule.bat :: :: Set variables TaskName, Task and go ahead :: :: http://myunster.com :: ::*******************************************:: @ECHO off REM Delete variables, may be cached SET "TaskName=" SET "Task=" REM Set variables SET TaskName=Everything REM Following task will be executed on Logon :PROCESSOR :: Detect OS bit-ness on running system. Assumes 64-bit unless 64-bit components do not exist. SET "ARCH=64" IF NOT EXIST "%SystemRoot%\SysWOW64\cmd.exe" ( IF NOT DEFINED PROCESSOR_ARCHITEW6432 SET "ARCH=32" ) ::Begin install IF "%ARCH%"=="64" ( SET Task=\"%%ProgramFiles(x86)%%\Everything\Everything.exe\" -startup ) ELSE ( SET Task=\"%%ProgramFiles%%\Everything\Everything.exe\" -startup ) REM Determine if windows xpVER | find "XP" > NUL IF %ERRORLEVEL% == 0 GOTO ver_xp REM Determine if windows Vista/Win7 systeminfo | find "OS Name" > %TEMP%\osname.txt FOR /F "usebackq delims=: tokens=2" %%i IN (%TEMP%\osname.txt) DO SET Version=%%i DEL /F %TEMP%\osname.txt ECHO %Version% | find "Windows 7" > NUL IF %ERRORLEVEL% == 0 GOTO ver_7 ECHO %Version% | find "Windows Vista" > NUL IF %ERRORLEVEL% == 0 GOTO ver_vista :ver_xp :Run Windows XP specific commands here. REM Delete variable, may be cached SET "Result=" REM WinXP doesn't support TN for schtasks /query FOR /F "delims=, tokens=2" %%R IN ('schtasks /query /fo csv /v ^| findstr /L /C:"%TaskName%"') DO SET Result=%%R IF (%Result%)==() SET Result="-1" IF "%TaskName%" == %Result% ( REM Delete Task if it exists SCHTASKS /Delete /TN "%TaskName%" /F ) SCHTASKS /Create /TN "%TaskName%" /TR "%Task%" /SC ONLOGON /RL HIGHEST GOTO exit:ver_vista :Run Windows Vista specific commands here. GOTO Elevation :ver_7 :Run Windows 7 specific commands here. GOTO Elevation :Elevation REM Don't forget escape double quotes for CMD argument that you will pass to powershell PushD "%~dp0" IF EXIST "%~0.ELEVATED" DEL /F "%~0.ELEVATED" SET Argument=SCHTASKS /Create /F /TN \"%TaskName%\" /TR \"%Task%\" /SC ONLOGON /RL HIGHEST SET ELEVATED_CMD=PowerShell -Command (New-Object -com 'Shell.Application').ShellExecute('Cmd.exe', '/C %Argument%', '', 'runas') ECHO %ELEVATED_CMD% >> "%~0.ELEVATED" CALL %ELEVATED_CMD% DEL /F "%~0.ELEVATED" PopD GOTO exit :exit EXIT
-
How to convert Add-On to SFX file
Another example converting Add-on to sfx file. Reapers.Gimp.2.8.2.x86.Windows7.or.8.AddOn.WA Do the same process explained on the first post Create your config.txt (remember to save the file as UTF-8) Gimp282.txt ;!@Install@!UTF-8!GUIMode="2"MiscFlags="4";Version: GIMP-2.8.2 x86;Description=GIMP is a multi-platform photo manipulation tool.;GIMP is an acronym for GNU Image Manipulation Program.;The GIMP is suitable for a variety of image manipulation tasks, ;including photo retouching,;image composition, and image construction;Website=http://www.gimp.org/InstallPath="%PROGRAMFILES%\\GIMP 2"RunProgram="\"regedit\" /S Gimp86.reg"RunProgram="hidcon:cmd /c copy \"GIMP 2.lnk\" \"%ProgramData%\\Microsoft\\Windows\\Start Menu\\Programs\\\" /y"Delete="%PROGRAMFILES%\\GIMP 2\\GIMP 2.lnk"Delete="%PROGRAMFILES%\\GIMP 2\\Gimp86.reg";!@InstallEnd@! Create your exe file. Done
-
[Solved] unattended serial key
Select the trial key matching Windows 7 version you customize!
-
KB2533552 Problems
More help about this update: http://www.msfn.org/...post__p__965223 It seems this update can only be installed during sysprep or on a running system! It's needed to remove this update to your offline integration list! HTH
-
KB2533552 Problems
Have you read the error message inside dism.log file ? Have you tried to install the correct version amd64 for KB2533552 ? Here is some help: http://support.micro...b/2533552/en-us Maybe this can be solved trying to install this update at first and after all others !
-
Easeus Todo Backup Review and Giveaway!
Many thanks for this awesome giveaway. Added a plus to GOOGLE+ myselfidem "Antoine Ayllon" For Easeus Todo Backup Workstation Regards
- How to convert Add-On to SFX file
-
How to convert Add-On to SFX file
Yes, the code is correct and works fine. Tested with Notepad2.exe and EvethingSearch.exe using sfx modified module! Try it and let us know! *Edit: but to write with correct coding using sfx modified module, it seems also to me that is better to use the example you gave: RunProgram="hidcon:cmd /c copy Notepad2.inf \"%windir%\\INF\\\" /y" About regedit: the two codes work fine and are correct. Thanks alfreire. First post updated
-
How to convert Add-On to SFX file
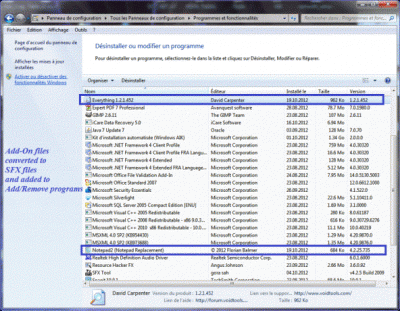
It would be sometimes interesting to use inf files with programs to uninstall this ones, if we want make a silent installation or uninstallation after Windows is loaded or installing with some others programs like WPI. The deal is to use the files included inside wa files to create an SFX file with silent switches. How to: 1 - Download the program: "Reapers.Notepad2.v4.2.25.735.x86.Windows7.or.8.AddOn.WA" (Add-on example) 2 - Unpack the folder using 7-Zip 3 - Remove the file Task.txt 4 - Inside "Notepad2" folder, move the Notepad2.reg and Notepad2.inf and all files included inside "Notepad2" 5 - Create an archive 7z for the folder "Notepad2" 6 - Create and UTF-8 txt file: Notepad2.txt ;!@Install@!UTF-8! GUIMode="2" MiscFlags="4" InstallPath="%PROGRAMFILES%\\Notepad2" RunProgram="hidcon:cmd /c copy Notepad2.inf \"%windir%\\INF\\\" /y" RunProgram="\"regedit\" /S Notepad2.reg" ;!@InstallEnd@! 7 - Create your exe file with the command: config.bat @copy /b /y 7zsd.sfx + Notepad2.txt + Notepad2.7z Notepad2.exe The program will be added inside: "Add/Remove programs" and we can remove this one. Tested with many programs and works fine (example: Everything Search Engine). HTH *Edit: Notepad2.txt (config.txt file example) updated.
-
Everything Search Engine - v1.3.3.658b
Thanks Geej, keep your good work.
- IE9 Failed when add by Win Toolkit
- x64 & x86 Autounattend.xml
_14e30a.png)
_8126ce.png)


