Everything posted by myselfidem
-
Create your own Autounattend.xml All-In-One (x86/amd64)
Thanks. It's not recommended to use "hidecon.exe" inside: %SystemDrive%\System32...exept, if you remove the command after the silent installation !
-
Create your own Autounattend.xml All-In-One (x86/amd64)
Yes, I understand. Many thanks. I haven't this problem. Missing inside your Autounattend.xml file AIO the first lines: <?xml version="1.0" encoding="utf-8"?> <unattend xmlns="urn:schemas-microsoft-com:unattend"> I will make an test with your values BUT adding subfolders (x86 and x64) for RunSynchronousCommands and FirstLogonCommands. Examples: <FirstLogonCommands> <SynchronousCommand wcm:action="add"> <CommandLine>hidcon %SystemDrive%\Install\x64\FirstLog_x64.cmd</CommandLine> <Description>Post Setup Installation</Description> <Order>1</Order> <RequiresUserInput>false</RequiresUserInput> </SynchronousCommand> </FirstLogonCommands> <component name="Microsoft-Windows-Deployment" processorArchitecture="x86" publicKeyToken="31bf3856ad364e35" language="neutral" versionScope="nonSxS" xmlns:wcm="http://schemas.microsoft.com/WMIConfig/2002/State" xmlns:xsi="http://www.w3.org/2001/XMLSchema-instance"> <RunSynchronous> <RunSynchronousCommand wcm:action="add"> <Order>1</Order> <Path>%SystemDrive%\Install\Apps\Daemon\x86\SPTDinst-x86.exe add /q</Path> </RunSynchronousCommand> </RunSynchronous> </component>
-
Create your own Autounattend.xml All-In-One (x86/amd64)
Weird! Tested whithout error my Autounattend.xml file AIO (x86/amd64) and no double messages (like "Accept EULA")! Could you share your Autounattend.xml file ?
-
Create your own Autounattend.xml All-In-One (x86/amd64)
@hornet512 SetProductKey.rar updated (and I removed one confirmation question!). @bphlpt It's already done since the first post I've made! You can downlaod SetProductKey.rar at first post in this thread. Thanks to let me know if there is errors. @RicaNeaga Nice and thanks!
-
BDLot's DVD Ripper Giveaway!
Could you send me a license? Thanks in advance.
-
Create your own Autounattend.xml All-In-One (x86/amd64)
Thanks hornet512 I've updated the batch file. Let me know if it's OK for you. Made many tests and all works fine for me. Now, no errors will be made with Automatic method to insert keys! And I will update the SetProductKey.rar folder! *Edit:post updated
-
Autounattend Question
Yes! Look at the Microsoft link I give you above using DISM: You can do that first with your mounted image, then unmount/commit! /Disable-Feature /FeatureName:<name_in_image> /PackageName:<name_in_image> Disables the specified feature in the image. You must use the /FeatureName option. Use the /Get-Features option to find the name of the feature in the image. Feature names are case sensitive. Examples: Dism /image:C:\test\offline /Disable-Feature /FeatureName:Hearts Dism /image:C:\test\offline /Disable-Feature /FeatureName:Calc /PackageName:Microsoft.Windows.Calc.Demo~6595b6144ccf1df~x86~en~1.0.0.0
-
Autounattend Question
Please ask your questions inside the right topic! Even if it's works on Windows 7 x86 it's not available for Windows 7! Look at the documentation .chm!
-
Autounattend Question
Remove the lines about: <servicing> <package action="configure"> Not available for Windows 7! More help: http://technet.microsoft.com/en-us/library/dd744311(WS.10).aspx
-
Create your own Autounattend.xml All-In-One (x86/amd64)
The best method about Autounattend.xml AIO (x86/amd64) , using options with "RunSynchronousCommand" and/or "FirstLogonCommand" is to use separate batch files! *Edit: post updated
-
Create your own Autounattend.xml All-In-One (x86/amd64)
I think your question is solved now! You have updated your post after my answer! Yes I'm complain about your writing message! And I found a workaround about your question! And I've made many TESTS! What do you want exactly?
-
Create your own Autounattend.xml All-In-One (x86/amd64)
It's not complicated, just answered your question and try to find a workaround! If it's solved for you. Nice! Of course, I know that also! Image OS 64-bit: https://skydrive.live.com/?cid=d178ea021b182b88&sc=documents&lc=1036&id=D178EA021B182B88%21114#!/?cid=d178ea021b182b88&sc=documents&uc=1&id=D178EA021B182B88%211345!cid=D178EA021B182B88&id=D178EA021B182B88%211394&sc=documents u=you It's too difficult to write = you?? ur=your it's too difficult to write correctly? n=and ? Stop it, please!
-
Create your own Autounattend.xml All-In-One (x86/amd64)
First, we must keep in mind that Autounattend.xml AIO isn't documented by Microsoft! Twice, we can try to found a workaround about some trouble, like RunSynchronusCommand and FirstLogonCommand! A workaround to install SPTDinst-v179-x86.exe or SPTDinst-v179-x64.exe is to create separate folders, like this (example): Programs are located inside the distribution folder: DVD\sources\$OEM$\$1\Install\Apps\86\SPTDinst-v179-x86.exe and DVD\sources\$OEM$\$1\Install\Apps\64\SPTDinst-v179-x64.exe There is two options for RunSynchronus inside Autounattend.xml file! <settings pass="specialize"> <component name="Microsoft-Windows-Deployment" processorArchitecture="x86" publicKeyToken="31bf3856ad364e35" language="neutral" versionScope="nonSxS" xmlns:wcm="http://schemas.microsoft.com/WMIConfig/2002/State" xmlns:xsi="http://www.w3.org/2001/XMLSchema-instance"> <RunSynchronous> <RunSynchronousCommand wcm:action="add"> <Order>1</Order> <Path>%SystemDrive%\Install\Apps\86\SPTDinst-v179-x86.exe add /q</Path> <Description>SPTDinst 32-bit</Description> </RunSynchronousCommand> </RunSynchronous> </component> <component name="Microsoft-Windows-Deployment" processorArchitecture="amd64" publicKeyToken="31bf3856ad364e35" language="neutral" versionScope="nonSxS" xmlns:wcm="http://schemas.microsoft.com/WMIConfig/2002/State" xmlns:xsi="http://www.w3.org/2001/XMLSchema-instance"> <RunSynchronous> <RunSynchronousCommand wcm:action="add"> <Order>1</Order> <Path>%SystemDrive%\Install\Apps\64\SPTDinst-v179-x64.exe add /q</Path> <Description>SPTDinst 64-bit</Description> </RunSynchronousCommand> </RunSynchronous> </component> If needed, we can use ONLY ONE PASSS for x86 or amd64 for FirstLogonCommand or RunSynchronusCommand! We must adapt the Autounattend.xml AIO file to suit our needs! *Edit: Please try to write good english, because english it's not my mother tongue. Thanks
-
Create your own Autounattend.xml All-In-One (x86/amd64)
The valid pass for SynchronousCommand is:<settings pass="oobeSystem"> Example: <settings pass="oobeSystem"> <component name="Microsoft-Windows-Shell-Setup" processorArchitecture="x86" publicKeyToken="31bf3856ad364e35" language="neutral" versionScope="nonSxS" xmlns:wcm="http://schemas.microsoft.com/WMIConfig/2002/State" xmlns:xsi="http://www.w3.org/2001/XMLSchema-instance"> <FirstLogonCommands> <SynchronousCommand wcm:action="add"> <CommandLine>c:\synccommands\command1.exe</CommandLine> <Description>Description_of_command1</Description> <Order>1</Order> </SynchronousCommand> <SynchronousCommand wcm:action="add"> <CommandLine>c:\synccommands\command2.exe</CommandLine> <Description>Description_of_command2</Description> <Order>2</Order> </SynchronousCommand> </FirstLogonCommands>
-
Create your own Autounattend.xml All-In-One (x86/amd64)
Could you share your FirstlogonCommands not working?
-
Create your own Autounattend.xml All-In-One (x86/amd64)
I'm glad for you!!!
-
Create your own Autounattend.xml All-In-One (x86/amd64)
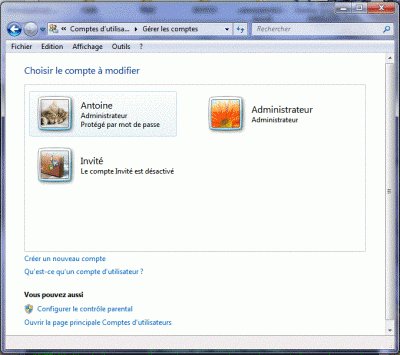
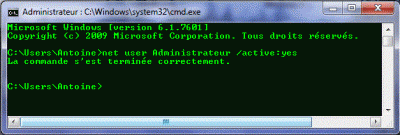
About User accounts: Group Enable and Disable the Built-in Administrator Account: http://technet.microsoft.com/en-us/library/dd744293(WS.10).aspx Using the net user command You can run this command after configuring the computer. Use the account names in the local version (example): Start | Run write: cmd and use: net user Administrateur /active:yes (French) You will see the Administrator account inside Control Panel | User accounts http://support.microsoft.com/kb/251394/en-us
-
Create your own Autounattend.xml All-In-One (x86/amd64)
Updated Autounattend.xml file, at my previous post above! The value for Computer Name was at the wrong place (used: Admin-PC as an example)! Thanks
-
Create your own Autounattend.xml All-In-One (x86/amd64)
New attached file with only one Administrator! Cheers
-
Create your own Autounattend.xml All-In-One (x86/amd64)
HOWEVER, we can have only One Administrator account whithout password, changing <LogonCount> value - and with the SAME USERNAME: Administrator: <AutoLogon> <Enabled>true</Enabled> <LogonCount>2</LogonCount> <Username>Administrator</Username> <Password> <Value></Value> </Password> </AutoLogon> <UserAccounts> <LocalAccounts> <LocalAccount wcm:action="add"> <Password> <Value></Value> <PlainText>true</PlainText> </Password> <DisplayName>Administrator</DisplayName> <Name>Administrator</Name> <Group>Administrators</Group> </LocalAccount> </LocalAccounts> </UserAccounts> Only One Administrator Account Image: https://skydrive.liv...85&sc=documents Autounattend.xml
-
Create your own Autounattend.xml All-In-One (x86/amd64)
As I said the built-in Administrator Auto Logon first...But you have 2 accounts: built-in Administrator and Administrator User (Admin)! *Edit: After many tests, I see we can't AutoLogon only with Built-in Administrator... A User account is always needed...And the User account must have a different name: you can't use the same name, like Administrator..You will have installation failing issue!! Fails using this value: <LogonCount>9999999</LogonCount>!!!
-
Create your own Autounattend.xml All-In-One (x86/amd64)
You can change the name, of course...And yes you will have to disable the UAC anyway!!
-
Create your own Autounattend.xml All-In-One (x86/amd64)
Your Autounattend.xml file with Administrator Carlese whithout password: <?xml version="1.0" encoding="utf-8"?> <unattend xmlns="urn:schemas-microsoft-com:unattend"> <settings pass="windowsPE"> <component name="Microsoft-Windows-International-Core-WinPE" processorArchitecture="amd64" publicKeyToken="31bf3856ad364e35" language="neutral" versionScope="nonSxS" xmlns:wcm="http://schemas.microsoft.com/WMIConfig/2002/State" xmlns:xsi="http://www.w3.org/2001/XMLSchema-instance"> <SetupUILanguage> <UILanguage>it-IT</UILanguage> </SetupUILanguage> <InputLocale>0410:00000410</InputLocale> <SystemLocale>it-IT</SystemLocale> <UILanguage>it-IT</UILanguage> <UserLocale>it-IT</UserLocale> </component> <component name="Microsoft-Windows-Setup" processorArchitecture="amd64" publicKeyToken="31bf3856ad364e35" language="neutral" versionScope="nonSxS" xmlns:wcm="http://schemas.microsoft.com/WMIConfig/2002/State" xmlns:xsi="http://www.w3.org/2001/XMLSchema-instance"> <DiskConfiguration> <WillShowUI>Always</WillShowUI> </DiskConfiguration> <ImageInstall> <OSImage> <InstallFrom> <MetaData wcm:action="add"> <Key>/IMAGE/NAME</Key> <Value>Windows 7 HOMEPREMIUM</Value> </MetaData> </InstallFrom> </OSImage> </ImageInstall> <UserData> <AcceptEula>true</AcceptEula> <ProductKey> <Key>RHPQ2-RMFJH-74XYM-BH4JX-XM76F</Key> <WillShowUI>OnError</WillShowUI> </ProductKey> </UserData> </component> </settings> <settings pass="specialize"> <component name="Microsoft-Windows-Security-SPP-UX" processorArchitecture="amd64" publicKeyToken="31bf3856ad364e35" language="neutral" versionScope="nonSxS" xmlns:wcm="http://schemas.microsoft.com/WMIConfig/2002/State" xmlns:xsi="http://www.w3.org/2001/XMLSchema-instance"> <SkipAutoActivation>true</SkipAutoActivation> </component> <component name="Microsoft-Windows-Shell-Setup" processorArchitecture="amd64" publicKeyToken="31bf3856ad364e35" language="neutral" versionScope="nonSxS" xmlns:wcm="http://schemas.microsoft.com/WMIConfig/2002/State" xmlns:xsi="http://www.w3.org/2001/XMLSchema-instance"> <!-- Adapt the COMPUTER NAME to suit your needs --> <ComputerName>Carlese-PC</ComputerName> <TimeZone>W. Europe Standard Time</TimeZone> </component> </settings> <settings pass="oobeSystem"> <component name="Microsoft-Windows-International-Core" processorArchitecture="amd64" publicKeyToken="31bf3856ad364e35" language="neutral" versionScope="nonSxS" xmlns:wcm="http://schemas.microsoft.com/WMIConfig/2002/State" xmlns:xsi="http://www.w3.org/2001/XMLSchema-instance"> <UILanguage>it-IT</UILanguage> <UserLocale>it-IT</UserLocale> <InputLocale>0410:00000410</InputLocale> </component> <component name="Microsoft-Windows-Shell-Setup" processorArchitecture="amd64" publicKeyToken="31bf3856ad364e35" language="neutral" versionScope="nonSxS" xmlns:wcm="http://schemas.microsoft.com/WMIConfig/2002/State" xmlns:xsi="http://www.w3.org/2001/XMLSchema-instance"> <TimeZone>W. Europe Standard Time</TimeZone> <OOBE> <HideEULAPage>true</HideEULAPage> <NetworkLocation>Home</NetworkLocation> <ProtectYourPC>1</ProtectYourPC> </OOBE> <RegisteredOrganization>Frutto-Di-Mare</RegisteredOrganization> <AutoLogon> <Password> <Value></Value> </Password> <Enabled>true</Enabled> <LogonCount>9999999</LogonCount> <Username>Carlese</Username> </AutoLogon> <UserAccounts> <LocalAccounts> <LocalAccount wcm:action="add"> <Password> <Value></Value> <PlainText>true</PlainText> </Password> <DisplayName>Carlese</DisplayName> <Name>Carlese</Name> <Group>Administrators</Group> </LocalAccount> </LocalAccounts> </UserAccounts> </component> </settings> </unattend> Always check your file with WSIM.
-
Create your own Autounattend.xml All-In-One (x86/amd64)
You can try this one... <RegisteredOrganization>: this value seems to not support blank spaces (gaps)!! About UAC: you must disable the UAC control if you don't want always show the dialog boxes even if you are Administrator! The previous Autounattend.xml have Auto Logon for built-in Administrator!!! Autounattend.xml
-
Create your own Autounattend.xml All-In-One (x86/amd64)
Attach your Autounattend.xml file and I will see with WSIM! The trouble is when the file is copied on notepad...On all Editors Forum the URL is writed twice!!! Try this one and let me know! Autounattend.xml
_14e30a.png)
_8126ce.png)


