How to change Citrix Xenapp v6.5 farm server Hostname and IP address
With the need for new network segmentation, our task was to change Citrix XenApp v6.5 farm server Hostname and IP address. Since this is a very sensitive task I have tried to find help on Google and with local Citrix support but without luck. Therefore we have decided to do it with one test Citrix XenApp v6.5 farm server and it resulted with success.
Just for a note, we are using VMware virtual machine clients for all Citrix XenApp v6.5 farm infrastructure.
Here is the list of the steps we did to change the Citrix hostname and IP address.
Select Citrix XenApp server for the hostname and IP address change
Remove any Published application from the server
Using Vmware client console change the IP server of the client. Along with this change, a network for the client also has to be changed on the VMware
Change the Citrix hostname and reboot the server
If you are using Citrix policy to specify the farm’s Citrix license server, this server has to be added to the Licensing policy manually! After this, do another reboot if needed.
The “old” XenApp server should appear in the list of the farm servers with the new name. If you can’t see it, restart the AppCenter console.
Now, publish Application or Applications that were published on the server before the name change
Test if everything is working properly
Once done, delete the “old” server name from the XenApp console.
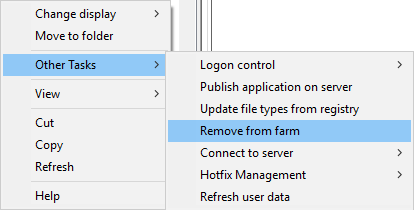
Select the “old” server from the server list, right click and Other Tasks –> Remove from farm

You will receive the following message when trying to remove the server from the farm.

Click Yes and connect to any of the XenApp servers. Check the farm status by running the qfarm command in command prompt. You should see the new server name in the list, and the “old” name removed from the list.
Hopefully this article will help you with a requirement to change Citrix XenApp v6.5 farm server names.


